Tube Style ABD/APD for Target Crossbows
(Version 3)

Construction | Destruction Testing | Flight Testing

     Documented here is a construction technique for an experimental APD for Bolts that will work with Target Style Crossbows. Please try this yourself with your own crossbows and help report the findings from using this. I apologize for the 'haphazardness' of this page, but it has been quickly modified through various incarnations of this APD. A clean version will come later.
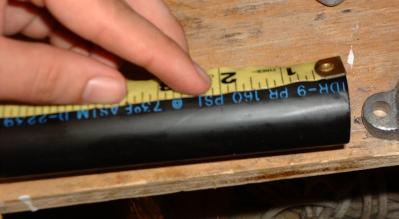
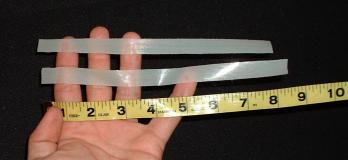
(Go see Version 1) | (Go see Version 2)


Step 1:
Purchase some Siloflex tubing (ASTM-2239, 160psi, 1" inner diameter, polyetheline tubing). Mark a 2" section of it off.

(Actually used 1" top this time)


Step 2:
Cut the tubing at a 45 degree angle, leaving the 2" section as the 'top' of the 45 degree angle, thereby making the bottom of the tube about 3".

(Actually used 1" top, leaving a 2" bottom)

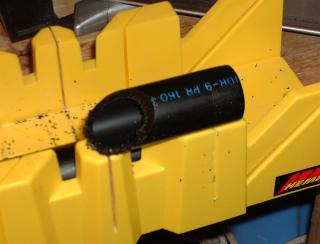
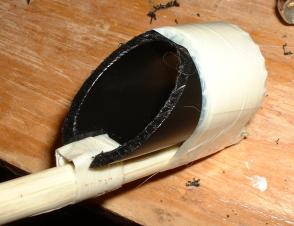
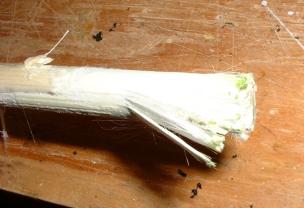
Step 3:
The look of the finished cut. Note if you can (blurry picture) that there are rough edges all around.
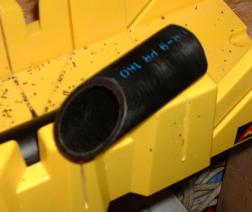
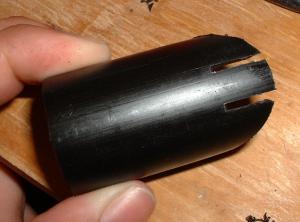
Step 4:
Use a utility knife to carve the 'plastic fringe' away, as well as to round the edges of both the front & back ends. Use sandpaper to further make the edges nice and smooth.
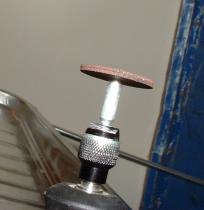
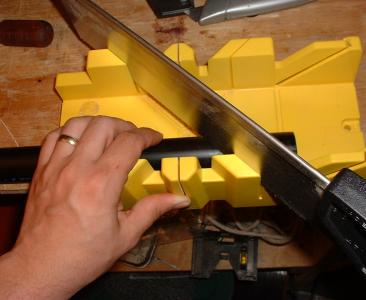
Step 5:
Mount 2 Heavy Duty cutting blades together on a dremel to allow for a 'wide cut' [NOTE: 3 regular blades would give a similar effect, or one could also use a hot knife or taped together hacksaw blades]


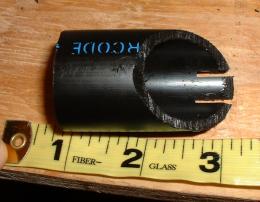
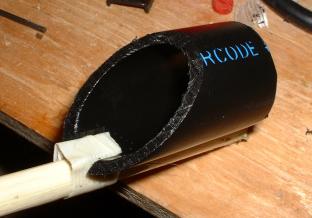
Step 6:
Using the dremel, cut parallel cuts in the front of the bottom of the tube. These cuts should go 1/2" deep (or a little more), and should be approximately 1/2" apart (or a little more).
Step 7:
Prepare a bolt for accepting the APD. This is a Markland style bolt which is completely wrapped in strapping tape, and has no fletches.
[NOTE: Yes, this is a HUGE bolt. It is 3/8" thick fiberglass, and is about 20" from nock end to the back of the bolt head. The crossbow that I have to use these on has a VERY long draw (13"). I have plans to make a smaller version with the APD as well, I just had these laying around to try them on.]
Step 8:
Take ONE length of 1/2" wide strapping tape, at about 8" long.


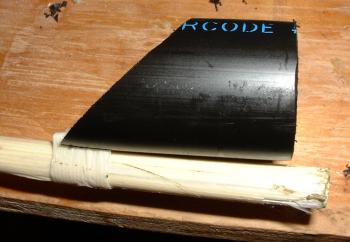
Step 9:
Attach the front of the APD, trying to make sure that the APD is 'basically straight' with the shaft. Do this by taking a piece of tape, and running it through, and around the slots & shaft. Keeping it as tight as possible. Note that the end of the APD needs to be AT MOST 1/2" from the butt of the bolt/arrow.
Step 10:
Cut a 1" wide strip of strapping tape, about 24" long.


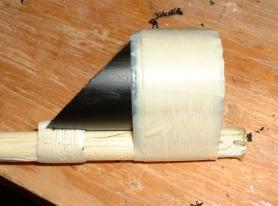
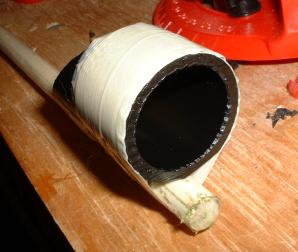
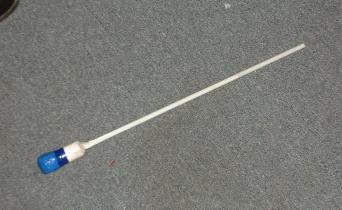
Step 11:
Attach the back of the shaft, It is hard to keep the butt end straight while doing this, but take your time. Accomplish this by wrapping the tape all the way around the APD and the shaft. Do it tightly for security, and to avoid wrinkles (especially on the bottom of the bolt).
Afterthoughts:
     Compared to version 2, this one feels like it has a little more wobble in it, due to the 'less tight' taping on the back. However it is very secure front/back wise. It flies very well, comparable to the 2" versions, although the butt end rotates a little more. But it seems much less affected by the wind, and has a further range.

Destruction Testing

     I did a few things. First of all I fired this shaft full force from a 42lb, 13in draw crossbow into the dome of a helm twice from 15ft. The blunt stayed firmly attached. I then decided to test the actual AP qualities of it. I took the shaft, and stood about a yard from a helm. I placed the shaft on my crossbow, and pulled it back about 9" of the 13" manually, held the end of the blunt approximately 2 feet from the grill on the helm (to make sure it hit the grill), and released. After a loud clang, everything was intact. I repeated this experiment again, and again, and again. I fired it 30 times in this method, with the APD holding firm, not budging a bit. I then got tired of this, and decided to fire it full force backwards into the helm from around 5 feet. The shaft itself actually split from the force at this point, and in it's splitting, ripped tape in the process. Note however that the APD still kept it from entering at least 3/4", as that was it's final placement on the shaft. This was pretty extreme testing, and I feel that to me, these APD's are very safe when made in this manner. Details are below.

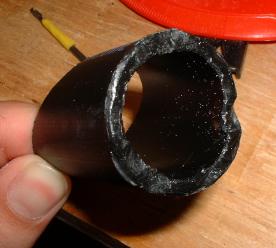
The APD after being brutally smacked into the helm 30+ times.


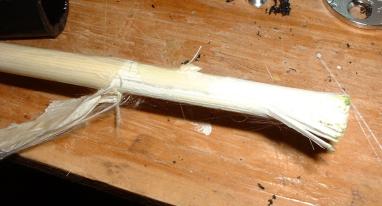
Here you can see where the shaft split after the full force firing, causing a slight dislodging of the APD.

Afterthoughts:
     This method holds up MUCH stronger than even the previous method, which had pretty amazing results. Overall good.

Flight Testing

     The most recent test results are in, and are very promising. I managed to get out to the range this weekend and in decent conditions get firing with multiple crossbows, and multiple ammo types. I think the results speak for themselves. So let's start with them. These were conducted in a similar manner to the original testing done below, except that these were not done with a level to keep them at 45 degrees, but instead kept at approximately a 30-35 degree angle aim, by using a consistant aim point.

42lb, 13in draw Crossbow
APD Specs Avg Dist % loss
2" top, 45° 123.0 16.4%
2" top, 30° 123.4 16.2%
1" top, 45° 135.0 8.2%
1" top, 30° 133.0 9.6%
Standard 147.2 -
125lb, 8in draw Crossbow
APD Specs Avg Dist % loss
2" top, 45° 179.4 10.3%
2" top, 30° 166.4 16.8%
1" top, 45° 190.6 4.7%
1" top, 30° 186.2 6.9%
Standard 200.0 -

     Based upon the above statistics, and my own feelings from shooting I have the following opinions. The 1" Tubes simply fly better. They are much less affected by the wind, and they have greater distance. The difference in angles seems to be a 'catch 22'. The longer angle makes for a heavier blunt (assuming the same top length), and therefore reduces distance further. However, they are 'slightly' more stable in flight (Note the word slightly). I personally feel that it will be personal preference in these matters to the archer, whether they feel the lessened distance is worth the slight stability. Both version are highly accurate, I was able on the 2nd shot to hit a 6 inch wide light post from 50yds with the 1" blunts (first one hit the 'feet', cause I didn't aim high enough).

     These flight tests, combined with the destruction tests, I feel indicate that these APD's are safe and effective on a combat crossbow, and that a 1" top is all that is needed/required. The original flight testing is included below, as it is still valid.


Original Testing

     First of all, I think my previous statement about the 'high wind problems' with this APD's are unfounded. I had previously attempted to do testing during high wind, and when I fired the bolts at a 45 degree angle, the tail ends got 'caught' by the wind and did nasty things, causing the bolts to rise, then drop like a rock.

     It turns out it seems that it isn't the wind (so much) as it is the bow I was using. The bow I was attempting to use is my 'current' combat crossbow, which was already destined for the trashcan. It is a 42lb, 13in draw bow, made with two fiberglass electric fence posts lashed together for it's prod (Extremely inefficient). The thing was very inaccurate from the first place, and it's release mechanism was a 'disappearing posts' method. It has two metal posts that stick up out of the stock that the string is pulled behind. You pull the trigger, the posts pull downward. I KNOW that this bow has some level of uneven pull on the prod sides, and I know that the release mechanism is probably (A) causing some amount of string jump, and (B) allowing one to go a second before the other.

     In any case, I went out to do testing again, this time in 'no to slight' wind. And the problem still existed. It seems to be a problem with this bow. Something about the way this bow shoots causes this to happen. Noone else has reported this problem though, and so I feel it is this crappy bow exaggerating the problem.

     Through testing, I did find that with a 'good bow' a gust of wind can still catch a bolt, but it's path is not modified nearly as greatly, and it rarely happens in fact. Also note that this really only applies to high angle shots (30 - 45 degree, which don't happen all that often with a crossbow in combat situations).

     Anyway, to continue testing I grabbed my target crossbow. It is WAAY overpowered for a combat crossbow, but I wanted to see how these flew in relation to each other, and I feel that the relative changes based upon design would still apply, no matter what the draw weight. This crossbow is 125# at 8 inches. Therefore making 1000 in-lbs. Again, a BIT overpowered for a combat bow using this ammo, but hopefully good data none the less, I look forward to seeing other people's testing results with a decent combat crossbow.

     I made multiple APD's for testing. My test cases were a 'regular' blunted bolt, a 2" top 45degree APD, a 3" top 45degree APD, and a 2" top 4" bottom ~30degree APD. I shot these in succession, hoping to equalize the current conditions for each volley. I did this 10 times, with my lady wife standing near the landing zone, with a measuring tape stretched out along the ground, watching for where it landed, and recording the distance. I used a 45 degree angle level, which I held with my thumb on the shelf of my crossbow to ensure an exact 45 degree launch each time. The wind was variable, but slight. Only one bolt 'tumbled' due to wind, this was the 3" APD, and this tumble is not included in the statistics. The results & comments follow:

Bolt Style Average Distance % Loss from Regular Comments
Regular 210.7 ft - The control bolt. It was flying just fine.
2" APD 184.0 ft 12.8% This was the second most stable design in flight. The rear end would twist and tumble a bit, wave from side to side in the wind, but the head always stayed on target. It also was the longest shooting.
3" APD 161.6 ft 23.3% This was bad. Not only was range adversely affected by the extra weight/drag, but this one was highly affected by wind. It would often curve to one side or another easily at a slight gust. Was very unstable in flight compared to the 2" even in no wind conditions.
30 Degree APD 181.8 ft 13.7% This guy had slightly less range than the 2" APD, but almost immeasureably so. However, this bolt was VERY stable in flight. It was almost always heading true, butt following front nicely. Was a joy to watch these fly.

     My overall feeling after this is that going to a 3" APD is definately too much (and destruction testing shows that 2" holds up fine). It seems that either the 45 degree or the 30 degree works fine. The 45 degree gets a hit more range, and is still accurate. The 30 degree looks beautiful in flight, and perhaps is slightly more accurate. Archer's choice.

     My biggest comment comes from after this testing, just doing some shooting with them. I went shooting for a bit, and was doing a few different things. For one, I fired the blunts at 'normal long combat range' I picked a good aim point, anchored, and let loose at probably around a 15-20 degree angle. At this angle, the 2" and the 30 degree flew beautiful, straight, on target, and went around 120 feet (the regular went only a few feet farther, around 125). The 3" one still had a bit of accuracy problems, and dropped a bit shorter. So at the 40yd range, it seems either 2" works just fine, and the difference in distance isn't in the 10's of percents, but more around 5%. I did this a number of times. I also fired at a few trees from varying distances (15ft to around 60ft). I was able to bullseye the tree accurately with the Regular, 2" and 30 degree blunts. The 3" was almost equally accurate, but wobbled a fair bit while doing it. It's back end sometimes visibly dropping (due to drag/weight?).

     So overall I think these things work great. But just have a few issues with being shot at 45 degree angles. They like their angles a little bit lower, which is fine for 98% of all Combat Archery that I have been in.


Webbed by: Lord Siegfried Sebastian Faust (mka Eli White) (eliwhite@adelphia.net)